


 Social Commerce Guide 2026: Unlock Revenue for Your Brand
You've probably done some version of this already. You have a product you know customers will love, you put it on a white background, take a few shots, and the result still looks cheap. Then you start shopping for a camera and get buried in jargon about full-frame sensors, autofocus systems, stabilization, burst rates, and video specs you may never use.
That's where a lot of brands overspend.
For product work, the camera body matters, but it usually isn't the thing making your photos look amateur. Controlled light, the right lens, consistent framing, accurate white balance, and a repeatable workflow do far more for an e-commerce catalog than a flagship body built for sports or documentary shooting. A recent buying guide points out that an entry-level DSLR is enough for most product shoots because the subject is stationary, and that 24MP is sufficient in many cases, with higher resolution becoming more useful for print work (Digital Camera World on product photography cameras).
That should change how you shop for good cameras for product photography. Don't ask, “What's the most expensive body we can justify?” Ask, “What setup lets us create clean, repeatable, color-accurate images every week without friction?”
Table of Contents
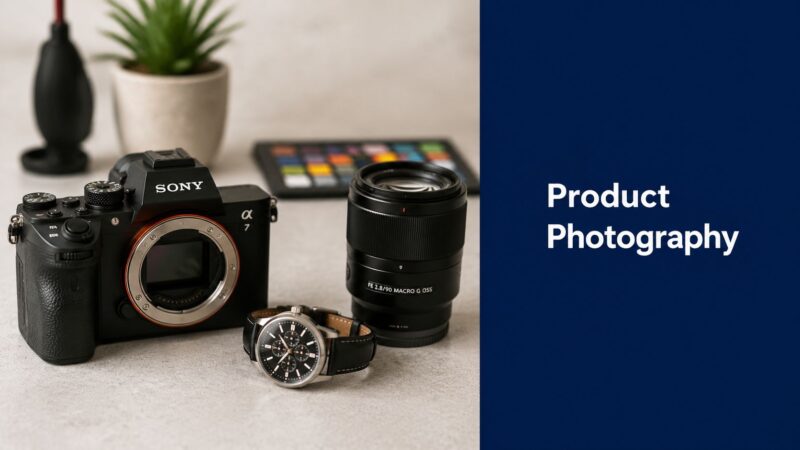
Your Guide to Choosing Good Cameras for Product Photography
A good product camera is a reliable tool, not a status symbol.
For most brands, that means choosing a camera that gives you dependable image quality, manual control, and files that hold up in editing. It doesn't need to be the camera a wedding photographer uses in a dark reception hall, and it doesn't need to be the one a sports shooter uses to track a sprinter across a stadium. Product photography is slower and more deliberate. The product stays still. The light should stay still. The camera often stays on a tripod.
What brands usually get wrong
The common mistake is buying for headline specs instead of buying for the job. Fast autofocus sounds impressive. In-body stabilization sounds reassuring. Extreme high-ISO performance sounds professional. But if you're photographing skincare bottles, kitchenware, electronics, or packaged goods in a controlled setup, those features don't solve the core problem.
The problem is usually one of these:
- Flat lighting that hides texture and shape
- A weak lens that softens edges or distorts the product
- Inconsistent white balance across a product line
- A messy capture process that makes approvals slow
- No repeatable setup for future SKUs
Practical rule: Buy the camera body after you've decided how you'll light the product, what lens you need, and whether your team will shoot tethered.
What good enough really means
“Good enough” doesn't mean cutting corners. It means spending where image quality improves.
In product photography, that often means a modest camera body paired with a sharper lens and a disciplined setup. A dependable camera with manual controls and consistent output beats an expensive body loaded with action features you won't touch. If your team can lock exposure, set white balance correctly, keep the camera stable, and repeat the same angle across a whole catalog, you're already working like a commercial studio.
That's the true benchmark for good cameras for product photography. Not hype. Not spec-sheet theater. A system that gets approved images out the door.
Core Camera Features That Actually Matter for Products
The camera market loves to sell speed. Product photography needs precision.
When I evaluate cameras for product work, I care about three things first. Sensor size, resolution, and manual control over files and color. Think of these as the foundation. Everything else is secondary until these are handled.

Sensor size and why it matters less than people think
Sensor size affects how a camera gathers light and renders detail. The easiest analogy is a painting surface. A larger canvas gives you more room to work, but a smaller canvas can still produce excellent work if the artist knows what they're doing.
That's the full-frame versus APS-C conversation in plain terms. Full-frame gives you more flexibility and can help with image quality, but it isn't mandatory for strong product photos. In a controlled setup with a tripod and intentional lighting, an APS-C camera can do excellent work. What matters is that the camera lets you work manually and consistently.
For many e-commerce teams, a smaller-sensor camera is the smarter buy because it leaves budget for the lens, support gear, and editing workflow.
Resolution and when more megapixels help
Megapixels matter, but only to a point.
Higher resolution helps preserve the fine texture in packaging, labels, stitching, embossing, and small product details. One expert roundup specifically highlights the Canon EOS R5C's 45-megapixel sensor as ideal for capturing minute detail in product images (Tom Crowl's camera roundup for product photography). That's useful if you crop aggressively, need very detailed hero images, or produce print assets alongside e-commerce images.
But don't confuse “helpful” with “required.” A lot of brands buy excess resolution when they really need cleaner lighting and better optics.
A practical way to think about resolution:
- Catalog and marketplace listings usually reward consistency more than extreme file size
- Close crops of labels and finishes benefit from extra resolution
- Print and multi-use campaigns make a stronger case for higher megapixel bodies
RAW files and manual controls are not optional
If your brand cares about accurate color, RAW capture matters. JPEG throws away information. RAW keeps more of the original image data, which gives your retoucher or in-house editor more control over white balance, exposure, and product color.
That's especially important when you're photographing product lines that must match across dozens of SKUs. A blue bottle can't shift cyan in one image and purple in the next. A beige fabric can't drift warm in one setup and gray in another.
Manual controls are what make that consistency possible:
- Manual exposure keeps brightness stable from frame to frame
- White balance control prevents color drift as lights change
- Manual focus options help with precise product placement
- RAW capture protects your editing latitude
If you're working with outside creators, it helps to review creators who understand these fundamentals rather than just listing gear. That's why some brands screen photographers through portfolio and workflow criteria on platforms such as JoinBrands creator profiles.
A camera that gives you repeatable files is more valuable for product work than one that gives you exciting specs.
Why Your Lens Is More Important Than Your Camera
A weak lens on a strong camera is like printing luxury packaging with a cheap label stock. The premium impression falls apart fast.
Lens choice shapes the look of the product more directly than is commonly understood. It affects sharpness, edge fidelity, close-focusing ability, and perspective. Those are the things buyers observe. If the product looks warped, soft, or oddly proportioned, nobody cares how advanced the camera body was.

Perspective is the silent quality killer
Most amateur-looking product photos have one of two lens problems. The lens is too wide, or it just isn't very sharp.
Wide lenses can make products bulge or stretch, especially near the edges of the frame. That's fine for dramatic editorial work. It's bad for catalog accuracy. A cosmetic jar starts looking fat. A bottle neck looks exaggerated. A rectangular package stops looking square.
This is one reason smartphone images often look “off” for product-only photography, even when they're bright and clean. The perspective can feel less trustworthy.
The safe choices that work again and again
For most tabletop product work, normal focal lengths are easier to control. One industry guide recommends skipping the kit lens and using a 35mm or 50mm f/2.8 lens for sharper, more usable product images, while also suggesting a macro lens for small items like jewelry when close focusing is required (Maker's Business Toolkit on choosing a product photography camera).
That advice holds up in practice because these lenses usually give you:
- Cleaner perspective than wider options
- Better sharpness than basic bundled lenses
- More consistent framing for repeated product sets
- Less visual gimmickry, which is exactly what catalog work needs
If I were building a simple starter kit for a brand team, I'd be more comfortable with a modest camera body and a good normal lens than the other way around.
When you need a macro lens
Small products change the equation. Jewelry, watch faces, texture details, ports on electronics, stitching on accessories, and ingredient labels all ask more from the lens.
A macro lens isn't just for dramatic close-ups. It gives you proper close-focusing ability without fighting the camera. That matters when your shot list includes both a clean front-facing SKU image and a cropped detail of engraving or finish.
The fastest way to improve product images is often to retire the kit lens before replacing the camera body.
Kit lenses can be convenient, but convenience is not the same as fidelity. For product photography, a good lens is often the difference between “good enough for the listing” and “good enough for the brand.”
Finding the Right Camera in Your Budget Tier
A brand manager often asks the wrong budget question first. They ask, “What camera should we buy?” The better question is, “What file do we need at the end, and how often do we need to produce it?”
That shift prevents a lot of overspending. A camera body should fit the job, the team, and the pace of production. For product photography, the smartest buy is rarely the most expensive body in the store. It is the one that gives you dependable files, straightforward controls, and a smooth studio routine without pulling budget away from the parts of the setup that shape the final image.
Tier 1 entry-level workhorse
This tier covers a lot of perfectly usable cameras.
Older DSLRs and older mirrorless bodies still handle product work well if they offer manual exposure control, RAW capture, and consistent color. For static subjects on a tripod, you do not need blazing autofocus, high burst rates, or expensive video features. Those are nice to have. They do not usually improve a clean catalog shot of a bottle, box, or folded garment.
Best for teams that are:
- Launching a product line and need simple white-background imagery
- Shooting a manageable SKU count in-house
- Trying to allocate more budget to lenses and lighting
Tier 2 prosumer sweet spot
Many growing e-commerce teams should make this their first consideration.
You get better day-to-day handling, stronger battery life in many systems, cleaner menu design, and fewer small frustrations during repetitive shoots. That matters more than spec-sheet bragging rights. If your team is photographing products every week, the time saved through better controls and more dependable operation adds up quickly.
Sensor improvements in this tier can help too, but mostly in practical ways. You may get a bit more room to crop, slightly cleaner files, and better color depth. It is similar to working on a larger cutting board in a kitchen. You do not cook differently, but you have more space to work cleanly and make fewer compromises.
If your team also works with outside creators for supporting content, it helps to review the visual standard you want before buying gear. A reference point like this beauty product photography creator example can clarify whether you need a studio-focused setup, a lifestyle-focused setup, or both.
Tier 3 commercial studio body
Higher-end bodies earn their keep in narrower situations.
They make sense for print campaigns, aggressive cropping, large retouching pipelines, and approval processes where art directors may inspect files at a painful level of detail. They also help when a studio needs stronger tethering support, longer duty cycles, or more confidence over long shoot days.
For many brands, though, overspending often begins here. Extra resolution sounds impressive until it slows file handling, fills storage faster, and lengthens retouching time without improving the product page in any meaningful way. A premium body is useful only when the rest of the workflow can effectively use what it produces.
| Tier | Price Range | Typical Features | Best For |
|---|---|---|---|
| Entry-level workhorse | Under $800 | Older DSLR or mirrorless bodies, RAW capture, manual controls, solid image quality | Basic e-commerce listings, startup catalogs, small in-house teams |
| Prosumer sweet spot | $800-$2000 | Better handling, improved sensors, stronger operational reliability, more efficient controls | Frequent product shoots, growing DTC brands, teams that need smoother studio workflow |
| Commercial studio body | Over $2000 | Higher-resolution sensors, stronger crop flexibility, premium build and studio-oriented operation | Print work, heavy cropping, demanding commercial production environments |
The point of diminishing returns arrives earlier than many buyers expect. If images still look flat, inconsistent, or cheap after a body upgrade, the bottleneck is usually somewhere else in the chain. In product work, that usually means lighting control, lens choice, set consistency, or file review discipline.
The Professional Workflow That Transforms Photos
A brand team can spend heavily on a new camera body and still end the day with unusable product shots. The usual failure points are simpler than that. Reflections were not controlled, color drifted between setups, dust was missed, or nobody checked the files properly until the set was already broken down.
A professional workflow fixes those problems before they become retouching work. That is the essential "good enough" principle in product photography. Use a camera that gives you clean RAW files and dependable handling, then put the budget into the parts of the process that change the final image.

Light is the upgrade clients actually see
Lighting decides whether a product looks premium, flat, soft, clinical, glossy, or cheap. The camera records that decision. It does not make it for you.
For products, I treat lighting as the shaping tool and the camera as the capture tool. A larger sensor can give you more flexibility, but lighting changes the picture in a way a body upgrade usually does not. It works like the difference between better ingredients and a larger plate. The plate matters, but the ingredients decide the meal.
The practical studio choice is often strobes versus continuous lights. Strobes give you more output and make it easier to keep ISO low and files clean. Continuous lights let less experienced teams see the effect in real time, which speeds setup and reduces guesswork. Either option can work well if the light can be flagged, diffused, and repeated across a full SKU range.
Consistency matters more than headline power.
Tethering catches expensive mistakes early
A camera screen is fine for checking basic framing. It is poor for checking the details that get a product image rejected. Dust on a black bottle, a label turned two degrees off-center, a warped carton edge, or a highlight slicing across a logo can all slip by on the back screen.
Tethering to a computer changes the pace of the shoot because the team can judge the image at a usable size while the product is still on set. That matters far more than a small gain in sensor performance for many e-commerce workflows.
This walkthrough gives a useful visual sense of how product shooters build repeatable setups:
A tethered setup helps the team:
- Check focus at full size before the next angle
- Spot dust, dents, and label issues while they are still easy to fix
- Get live approvals from marketing or clients without passing files around later
- Keep crops and composition consistent across a whole product line
That last point matters for catalog work. One strong hero image is easy. Producing 40 matching images is where process separates professional work from expensive improvisation.
Color control and post routine
Color is where many in-house shoots start to drift. One day the white background runs warm. The next day the packaging looks too magenta. By the time those images sit together on a collection page, the brand looks inconsistent.
The fix is usually plain, not glamorous. Lock the lighting. Set a custom white balance or use a color reference. Keep exposure and camera position repeatable. Apply the same editing logic to every file, especially for background white, shadow density, and crop spacing.
A reliable post routine usually includes:
- A stable lighting setup that stays fixed during the shoot
- A color reference frame so packaging and materials stay believable
- A repeatable edit for cleanup, contrast, and cropping
- A final QC pass on a larger screen before delivery
If you work with distributed creators, JoinBrands creator workflows for beauty product content can help organize briefs and approvals. The underlying standard stays the same. Professional-looking product photos come from removing variables, not from buying the most expensive camera in the room.
Good product photography comes from a controlled process. The camera only performs as well as the workflow around it.
Checklist for Briefing Photography Creators
When a brand asks, “What camera do you use?” the answer rarely tells you enough.
A better brief tests whether the creator can produce consistent product images that fit your brand. Camera model matters far less than whether they can handle color, detail, lighting, and approval requirements without guesswork.

Ask workflow questions, not vanity questions
Use this checklist when briefing freelancers, creators, or small studios:
Can you shoot in RAW format
RAW files make color correction and exposure matching much easier. That matters if your brand has strict visual standards.Do you own a macro lens or close-focusing setup
If your product has small details, you need to know they can capture them cleanly.What lighting setup do you use for product-only photography
This tells you more than a camera list ever will. Listen for control, not brand names.Can you shoot tethered for live review or remote approvals
This is especially useful when stakeholders want to check framing and packaging details before the shoot wraps.How do you handle white balance and color consistency
A creator who can answer this clearly usually has a real process.
Review the portfolio with the right eye
Don't just look for pretty images. Look for discipline.
Check whether the creator can maintain:
- Consistent shadows and reflections
- Stable color across multiple products
- Clean edge definition on white backgrounds
- Accurate proportions without obvious distortion
Ask to see a sequence, not just a hero shot. One polished image proves taste. A full set proves process.
A creator marketplace profile can be useful if it helps you review product categories, visual style, and execution standards. For that reason, some teams start with portfolios on creator pages such as this one, then move into a more detailed brief before approving a shoot.
Your Next Steps to Perfect Product Shots
If you remember one thing, make it this. Good cameras for product photography are the ones that fit into a controlled, repeatable workflow. Not the ones with the loudest marketing.
Start with the images you need most. If your priority is clean e-commerce listings, buy for reliability, manual control, and lens quality. If you need fine-detail close-ups, add a macro lens before chasing a more expensive body. If your team struggles with consistency, invest in lighting and tethered review before upgrading cameras again.
For brands in detail-heavy categories, it also helps to study niche-specific shooting advice. If you sell rings, necklaces, or gemstone pieces, these tips for jewelry boutique owners are a useful complement because jewelry exposes every weakness in focus, reflection control, and close-up technique.
You're in a much better position now to make a smart choice. That might mean buying a modest in-house setup. It might mean hiring a creator who already has the right lens, lighting, and process. It might mean organizing approvals better through a platform like JoinBrands. Any of those can work if the workflow is solid.
If you need product photos, UGC, or creator support for a launch, JoinBrands is one option for finding creators, reviewing portfolios, and managing briefs in one place.